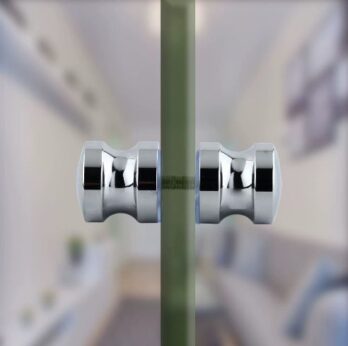
Selecting Back to Back Shower Door Knobs
A compact grip on both faces of the door
A back-to-back shower door knob places a small grip on each side of a glass panel, joined through a central fixing. It offers a different interface from a long pull handle: the projection, contact area and fixing arrangement are concentrated around one location. Select it through the actual door layout rather than by finish alone. Show where the grip will sit, how the door is intended to open and what lies nearby. Foundry Queen enquiries can then identify the proposed material, finish and supplied components without assuming that a catalogue photograph defines the whole installation.
Identify the EAH-04 configuration
The EAH-04 back-to-back shower door knob uses paired contoured grips connected through the glass. The source reference lists a 6 mm glass hole and tempered glass. Treat that hole size as part of a complete fabrication detail, with the selected template, fixing and contact components confirmed before ordering. The product photographs show the paired form and an installed view. They do not establish every dimension or accessory included in the supply. Keep the EAH-04 code with the door drawing and quantity schedule so the intended model remains clear throughout the enquiry.
Confirm the complete glass build-up
State the actual panel specification and thickness when enquiring about a knob. A material label or a photograph of a similar door does not identify the required contact pads, washers or fixing length. Confirm how the paired grips will be assembled around the glass and which components are included. Ask for the selected fabrication template rather than transferring a hole detail from another handle. Coordinate the knob location with the panel edges and other glass preparation. Keep the agreed drawing revision with the order so the fabricator and hardware supplier are reviewing the same interface.
Review the reference hole as a detail
The listed 6 mm hole is a reference for the EAH-04 family. Confirm the complete hole and fixing detail for the supplied version, including any required clearance, contact components and surface protection. Do not treat the number as a universal instruction for other knobs or pull handles. A different fixing thread, glass build-up or handle design can require a different review. If an existing panel is being assessed, provide its actual preparation and dimensions. The selected hardware should be checked against that information rather than assuming it can be fitted because its external appearance is similar.
Place the grip within the whole opening
The knob position affects access to the moving door and the clearance through its opening arc. Review its projection on both faces, the adjacent wall or screen, seals, stops and nearby fixtures. Show the selected location on the door drawing and confirm that the hardware can be installed and tightened. A compact grip may reduce the visible size of the handle, but it still needs a coordinated fixing detail. Keep the intended door operation clear in the enquiry, especially where different opening types or glass panel sizes are being ordered for one project.
Coordinate with the hinge family
A handle and hinge should be selected as parts of the same opening. A wall-mounted hinge connects the door to the building, while a glass-to-glass hinge connects it to a fixed panel. That difference can affect the layout around the grip and the available clearance. Compare the glass-to-wall hinge range and the glass-to-glass hinge range using their own drawings. Identify the chosen hinge and knob references on one schedule. Do not use a finish match as a substitute for checking the movement, panel preparation and support arrangement.
Choose the underlying material separately
The EAH-04 reference lists aluminium alloy, stainless steel 304 and stainless steel 316 as material options. Confirm which version is being quoted and supplied; the decorative appearance alone does not identify the alloy. Describe the installation environment and any required maintenance or documentation expectations. Ask for material confirmation that applies to the selected order rather than relying on a general catalogue statement. If a different material is requested, keep it identified as a separate enquiry until its dimensions, finish availability and manufacturing details are agreed. Record the final material and version with the quotation.
Agree a finish sample where appearance matters
Listed finish choices include brushed bronze, brushed nickel, matte black, polished chrome, polished nickel and satin brass. Availability should be confirmed for the selected material and order. Where the knob must match hinges or other visible fittings, compare an agreed sample rather than relying only on screen images. Colour, gloss and texture can appear different under different lighting and on different component shapes. Keep the sample reference with the hardware schedule and distinguish it from the underlying material specification. A new finish choice does not automatically create a different engineered knob model.
Confirm the paired components supplied
Ask whether the quotation includes the complete pair, central fixing, pads, washers and any other assembly components. A photograph can show parts that are not individually identified in the written supply scope. Confirm the fixing thread and how the contact components match the glass build-up. Keep matching parts together during packing and installation. For a project using several finishes, request clear identification so pairs are not mixed. Agree the supplied version and accessories before ordering instead of assuming that every item visible in an installed-view photograph is included with the product.
Use an agreed installation detail
The fitting arrangement should follow the approved product and glass details for the selected version. Confirm the sequence, tool access and supplied contact components with the responsible installer. Avoid inventing a tightening value or substituting a washer based on a generic online description. If a detail is missing or conflicts with the proposed glass, resolve it before installation proceeds. Keep the finish protected while the pair is handled and assembled. Any final operating check should consider the door, hinges, seals and stops together, with discrepancies recorded against the agreed drawing and supply scope.
Inspect delivery against the order
Check the model reference, pair quantity, material confirmation where agreed and visible finish condition when the hardware arrives. Confirm that the central fixings and contact components match the approved version. Compare the dimensions identified in the inspection scope rather than relying on appearance alone. Keep the components protected until use, and retain their identification if several models or finishes are present. Record missing or damaged items before installation proceeds. A clear purchase schedule and agreed packing list make it easier to distinguish a delivery discrepancy from an unresolved specification question.
Prepare a Foundry Queen knob enquiry
Send the door layout, glass build-up, proposed fixing location, required quantity, material and finish, delivery destination and any existing glass preparation. Identify the EAH-04 reference and include the relevant drawing revision. Use the Shower Door Hardware page to coordinate the adjoining categories, then submit the information through the Foundry Queen contact page. Confirm the final configuration, samples, accessories and delivery scope in the quotation. Source descriptions help identify the product, but they do not establish Foundry Queen stock, warranties or approvals for the proposed order.