 By Coco
Glass clips can look interchangeable while connecting to very different supports. Some clamp a panel through inserts, while other arrangements depend on specific drilled features or retention details. Before installation, the useful question is not whether a clip looks strong, but whether every interface matches the approved glazing system.
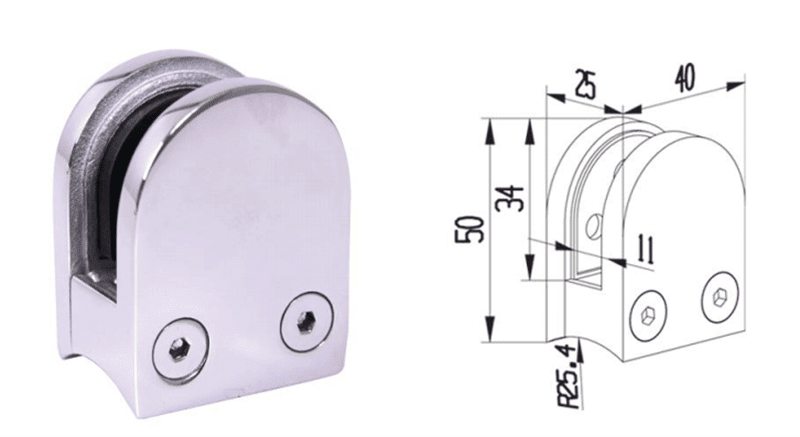
Identify the exact clip and its job
Record the model, mounting arrangement and panel position. Clarify whether the fitting locates, retains or supports the glass under the particular system design. A catalogue category can contain hardware intended for different applications, so the product name alone is insufficient.
Use our glass clamp category to identify a product family. Compare the selected drawing with the actual installation rather than making a selection from exterior dimensions only. Ask for written clarification when the intended retention method is not clear.
Match the mounting face
A flat-backed clip against a round tube and a curved-backed clip against a flat plate do not create the same bearing arrangement. Identify the support profile and its dimensions, then confirm the fitting’s mating surface. Decorative covers can hide the joint after assembly, making this check especially important before work starts.
The L6016-H curved-base clamp is one example of why the mounting face needs an explicit description. Its form should not be used to infer compatibility with every tube diameter.
Keep inserts and panel details together
Confirm the intended glass thickness and the correct insert set for the exact model. Inserts are functional parts of the connection, not disposable packing. Their material, geometry and installed condition can influence the interface. Do not improvise with extra layers to compensate for an unidentified mismatch.
Where the approved system requires a hole, pin or other positive retention feature, retain that detail in the glass preparation drawing. A clip that appears to grip a panel during a bench demonstration is not evidence that a different retention method may be omitted.
Check the support and fixing specification
Identify the supporting member, fixing size, thread engagement and access for assembly. Record whether the support is hollow, solid or part of a separate bracket. The person responsible for the system must approve the fixing detail; the clip manufacturer cannot assess an unknown substrate from a cropped photograph.
Follow the exact product instructions for assembly and any specified tightening procedure. A universal torque value is inappropriate because screws, inserts, glass preparation and support materials differ. If a fitting cannot be assembled as documented, stop and resolve the discrepancy before the panel is placed in service.
Example: a flat support substituted for a round post
A clip originally chosen for a round post may be offered for a flat plate because its external body looks suitable. The back face and fixing arrangement need review before that substitution. A gap hidden by a cover is still a change in the connection. Ask for the correct mating geometry or an approved adapter, and update the supply list rather than making an improvised packing adjustment during installation.
Define acceptance before the installer arrives
Create a receiving checklist with part number, finish, quantity, inserts and accessories. Check for visible transport damage and missing parts against the approved supply list. Keep questionable components separate so they cannot be fitted accidentally while a clarification is pending.
Finish protection also deserves planning. Confirm how the parts will be stored and what cleaning products are permitted after installation. Grinding debris, incompatible chemicals or rough handling can damage a surface before the system is handed over. Record the final product identification with the installation documents for future replacement.
Enquiry checklist
| Before installation | Confirm against |
|---|---|
| Clip identity | Exact model and approved system drawing |
| Contact surfaces | Support profile, inserts and glass details |
| Assembly | Specified fixings, access and installation instructions |
For an enquiry, provide the support drawing, panel specification and required finish through Foundry Queen’s contact page. Complete interface information is more useful than requesting a generic glass clip price.
Get Premium Casting Products
Join FoundryQueen.com Newsletter to get more information of different premium OEM Casting products in China.